A personalised nursery wall works best when one meaningful element leads the composition, the colours support the room rather than compete with it, and every piece is positioned with clear space around it. Start with the wall’s function, choose one focal point, match the material to the room, test the arrangement before mounting and keep every decorative piece securely fixed and completely out of a child’s reach.
The goal is not to fill an empty wall. It is to make the room feel calm, personal and visually complete. This guide shows how to style a personalised nursery wall around a name-based focal point, including how to choose placement, scale, material, spacing and supporting decor.
What Makes a Personalised Nursery Wall Look Balanced?
A balanced nursery wall usually has four clear parts:
- One focal point: the main piece that attracts attention first.
- A supporting palette: colours and materials already present in the room.
- Controlled spacing: enough breathing room for every element to remain readable.
- Safe placement: secure mounting on a suitable wall area, outside the child’s reach.
The most common styling mistake is treating every decorative object as equally important. When a name sign, framed print, shelf, garland and wall set all compete for attention, the wall feels busy even when the individual pieces are attractive. Choose the main feature first and let the remaining elements support it.
Start With the Wall, Not the Decoration
Before choosing a size or material, decide which nursery wall should carry the visual focus. The best location is not automatically the largest blank wall. It is the area that can be seen naturally when entering the room and can hold the decoration securely without interfering with everyday use.
Above a Dresser or Changing Unit
This placement creates a clear visual relationship between the furniture and the wall decor. Centre the composition over the furniture rather than across the entire wall. This usually makes the arrangement feel intentional, especially when the wall is wider than the dresser.
Beside a Reading Corner
A personalised wall set can help define a small reading or comfort corner without filling the whole room. A chair, soft rug or low book storage can provide the visual base, while the wall art adds identity above or beside the area.
On a Clear Feature Wall
A clear wall gives you more freedom to spread the pieces and create a wider composition. This works well when the personalised wall art is intended to be the room’s main decorative element.
Near the Cot or Crib
Decor near a sleep area requires extra caution. Never use loose, unstable or unsuitable fixings, and never position wall decor where a child can reach, pull or knock it down. When secure placement is uncertain, choose another wall such as the dresser wall, reading corner or an opposite feature wall.
Choose One Main Personalised Element
The child’s name is already a strong visual and emotional detail. It does not need to appear repeatedly across the same wall.
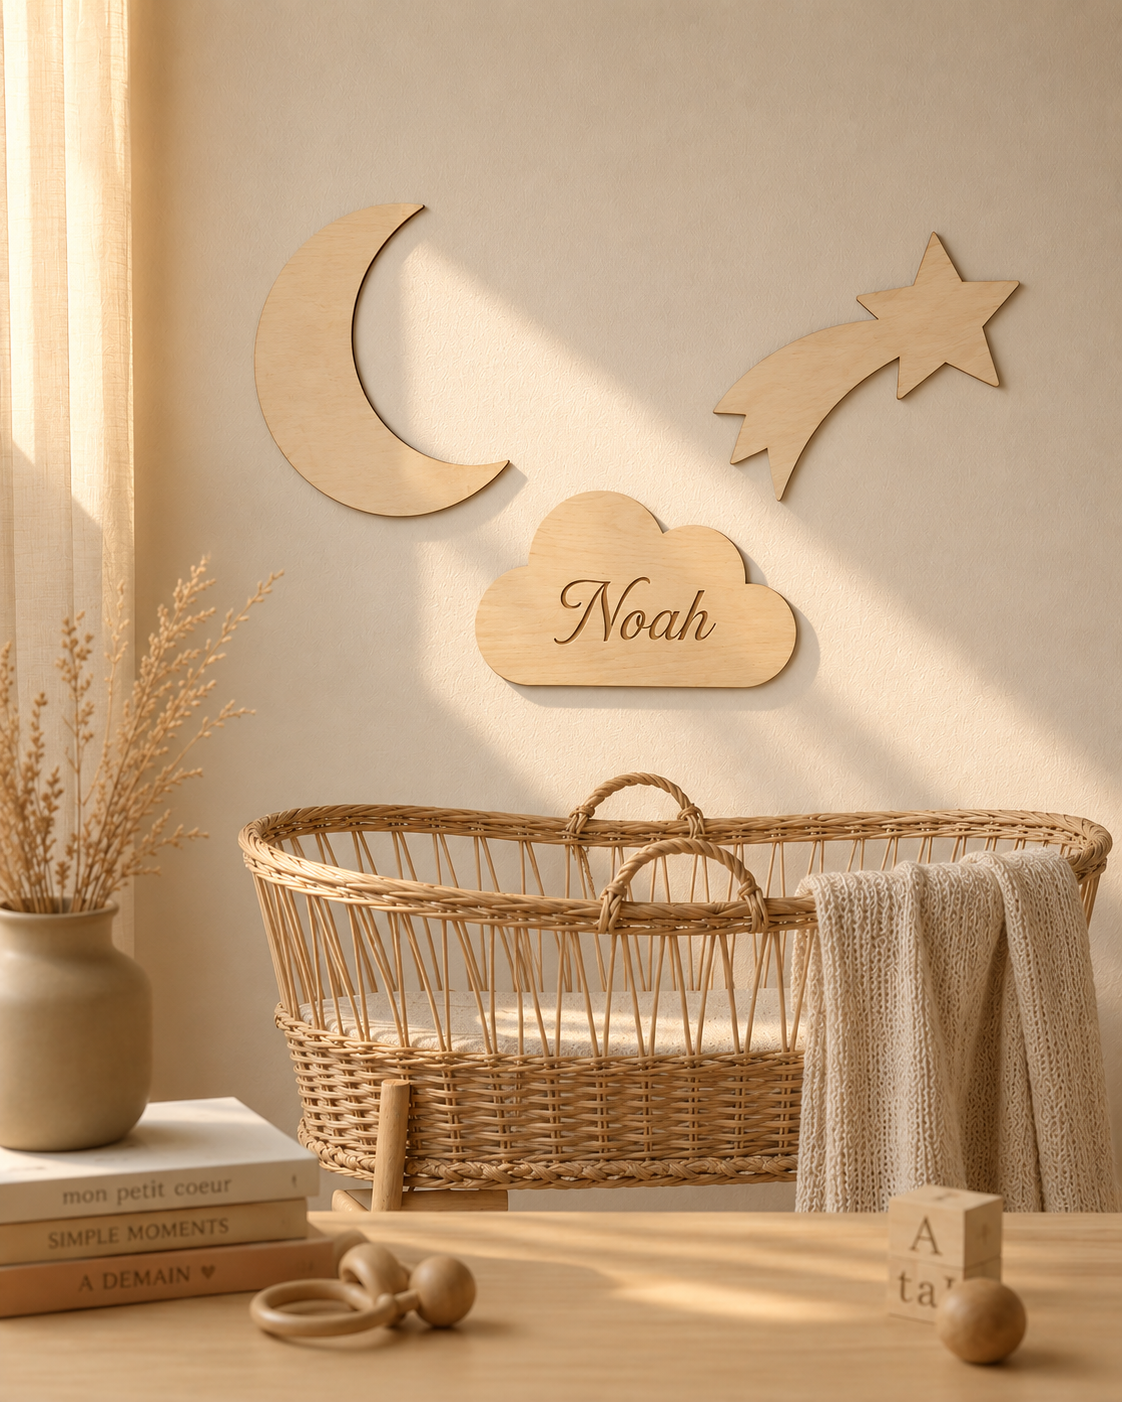
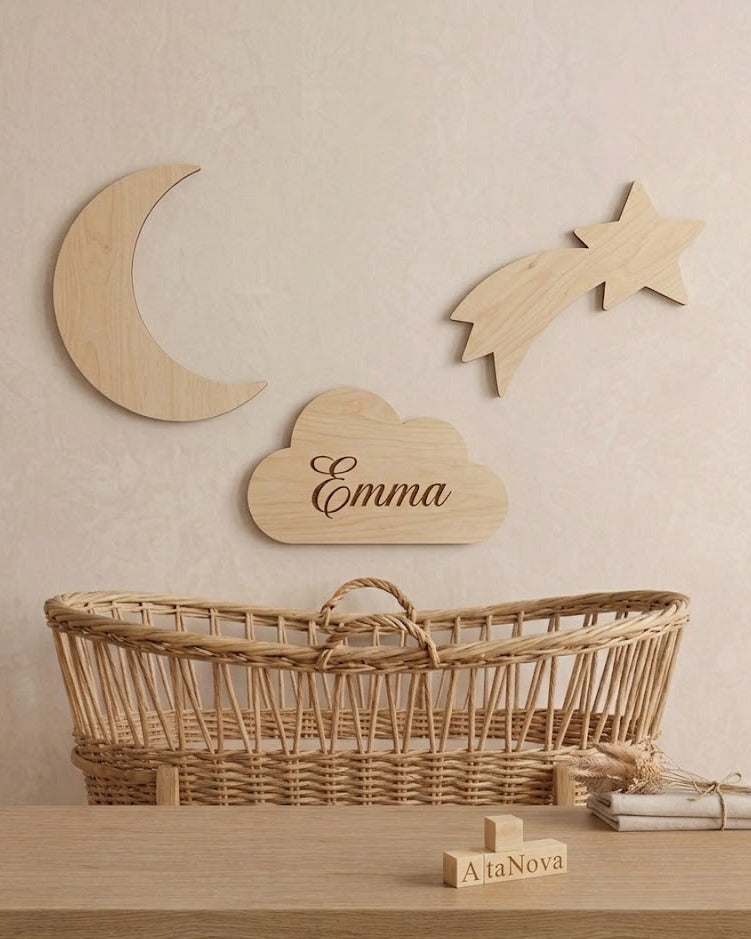
The Moon, Cloud & Star Personalised Nursery Wall Set works as a complete focal composition: the name is engraved on the cloud, while the moon and star create the supporting shape around it. Use it when you want one coordinated arrangement rather than several unrelated decorations.
A Nursery Name Sign is the more direct option when the name itself should be the main feature. It can be combined with prints or photographs, but it should not compete with another large name-based element on the same wall.
If you use both products in one room, separate their roles. For example, place the wall set above a dresser and use the standalone name sign on the bedroom door or another wall. Repeating the same name in two different zones can feel deliberate; repeating it twice in one composition usually feels crowded.
How to Style the Moon, Cloud and Star as One Composition
The personalised cloud should be positioned first because it carries the child’s name and acts as the visual centre. The moon and star can then be arranged around it.
Compact Arrangement
Place the three pieces relatively close together when the wall area is narrow, the room is small or the set sits above compact furniture. Keep the cloud central and use the moon and star to create a gentle outline around it.
Wide Arrangement
Increase the space between the pieces when the wall is broad or the set needs to relate to a wider dresser. The cloud should still remain visually dominant. Avoid spreading the moon and star so far apart that the three pieces stop reading as one set.
Balanced Asymmetry
The moon and star do not need to mirror each other perfectly. A slightly higher moon and lower star, or the reverse, can make the composition feel softer and less rigid. The important point is that the visual weight remains balanced around the personalised cloud.
Before mounting, place all three pieces on the floor in front of the wall or make paper templates in the same approximate dimensions. This lets you compare a compact, wide or asymmetrical layout without marking the wall.
Choosing the Right Size for the Wall
The wall set is available in 30 cm, 45 cm and 60 cm. The selected measurement refers to the approximate width of the cloud; the moon and star are scaled proportionally. The final width of the full arrangement depends on how much space you leave between the pieces.
30 cm
Choose 30 cm for a compact nursery, a narrow wall section, a small reading corner or a subtle arrangement above smaller furniture. It works best when the decoration should add personality without becoming the room’s dominant feature.
45 cm
Choose 45 cm for a balanced middle option. It suits many standard nursery layouts and gives the name enough presence while leaving flexibility for spacing around the moon and star.
60 cm
Choose 60 cm for a larger feature wall, broad furniture or a room where the personalised composition should be immediately noticeable. Allow sufficient empty space around the full set so the larger scale does not feel compressed.
Do not choose size from the product dimensions alone. Measure the usable wall area, note the width of the furniture below it and decide how much surrounding space the composition needs. A smaller set with controlled spacing often looks stronger than a large set forced into a narrow area.
Match the Material to the Nursery Palette
The right material should connect the personalised wall art to the room without requiring every surface to match exactly.
Wood for Warm and Natural Rooms
Wood works naturally with cream, beige, warm white, sage, clay, muted blue and other soft earth-based palettes. It also coordinates well with natural textiles, pale furniture, rattan details and understated Scandinavian or nature-inspired styling.
Natural grain and tone may vary slightly. Treat this as part of the material rather than trying to match the wood exactly to every item of furniture.
Black Acrylic for Clean Contrast
Black Acrylic gives the moon, cloud and star a stronger outline. It works well on light walls, in monochrome rooms or in modern nurseries where the composition needs definition without adding another colour.
Use black as a repeated accent in small amounts: a lamp detail, picture frame, drawer handle or patterned textile can make the wall art feel connected to the room.
Gold Acrylic for a Decorative Accent
Gold Acrylic suits warm neutrals, blush tones, muted pink, dusty blue, soft green and rooms that already use small metallic details. It creates a more decorative focal point, so the surrounding wall usually needs fewer additional elements.
Avoid adding gold to every object. Two or three restrained references across the room are enough to make the finish feel intentional.
Four Nursery Styling Directions That Work
Warm Neutral
- Wall: warm white, cream or light greige
- Wall art: Wood
- Supporting details: linen, rattan, pale oak, soft beige textiles
- Best effect: calm, natural and understated
Modern Monochrome
- Wall: white, light grey or very pale beige
- Wall art: Black Acrylic
- Supporting details: black frames, simple typography, limited patterns
- Best effect: clean, graphic and easy to adapt as the child grows
Soft Pastel
- Wall: muted pink, dusty blue, pale lilac or soft green
- Wall art: Gold Acrylic or Wood
- Supporting details: one or two repeated pastel tones, warm white textiles
- Best effect: gentle colour with a clear personalised centre
Nature-Inspired
- Wall: sage, clay, sand or warm neutral
- Wall art: Wood
- Supporting details: leaf shapes, animal illustrations, natural fibres
- Best effect: warm, grounded and visually connected
How Much Supporting Decor Should You Add?
Begin with the personalised piece and add only what the wall still needs. A complete three-piece wall set may already be enough.
When additional decor is useful, choose one supporting category:
- One or two framed prints in the same palette
- A small group of milestone photographs
- A simple wall light installed independently and safely
- A narrow shelf on a separate part of the wall
- A painted arch or colour block behind the main composition
Avoid using all of these at once. The more shapes, words and frames you add, the less clearly the child’s name functions as the focal point.
How to Style a Small Nursery Wall
A small room does not require tiny decoration everywhere. It requires fewer visual decisions.
- Choose one personalised focal point instead of a full gallery wall.
- Use the 30 cm or 45 cm size according to the usable wall area.
- Keep the space around the composition clear.
- Repeat the wall-art material only once or twice elsewhere in the room.
- Avoid multiple competing themes, fonts and decorative quotations.
- Use lighter walls and controlled contrast when the room already contains several colours.
In a compact nursery, visual calm matters more than the number of decorative objects. One well-scaled name-based composition can make the room feel more finished than a wall filled with smaller unrelated pieces.
Common Nursery Wall Styling Mistakes
Choosing the Product Before Measuring
The product may fit physically but still feel too small, too large or too compressed once the three-piece arrangement is spaced across the wall. Measure the usable area and the furniture below it first.
Mounting Without Testing the Layout
A few centimetres can change the balance of the moon, cloud and star. Test the full composition with templates before attaching anything.
Using Too Many Personalised Pieces Together
A name becomes less special when it appears repeatedly in the same view. Let one piece carry the personalisation and use supporting decor for colour, texture or photographs.
Matching Every Colour Exactly
A coordinated nursery does not require identical shades. Repeating a material or accent colour in two or three places usually creates enough connection.
Ignoring the Design Proof
The name is the centre of the wall set. Check spelling, accents and the overall layout carefully when the Design Proof arrives. Production starts after approval.
Using an Unsuitable Mounting Method
Mounting materials are not included because the correct fixing depends on the wall surface and product weight. Use a secure method suitable for your wall, follow the fixing manufacturer’s instructions and keep all pieces out of reach of babies and young children.
A Practical Styling Plan From Empty Wall to Finished Nursery
- Choose the wall: identify the safest and most visible suitable area.
- Measure the usable space: include the furniture width and the empty area around it.
- Select the focal piece: choose a coordinated wall set or a standalone name sign.
- Choose the size: compare 30 cm, 45 cm and 60 cm with the available wall area.
- Choose the material: use Wood for warmth, Black Acrylic for contrast or Gold Acrylic for a decorative accent.
- Test the composition: arrange paper templates before mounting.
- Approve the personalisation: check the name and layout on the Design Proof.
- Mount securely: use fixings appropriate for the wall type and keep the pieces out of reach.
- Add support only if needed: use a limited number of prints, photographs or colour accents.
- Review the whole room: remove anything that competes with the focal point.
Wall Art Set or Standalone Nursery Name Sign?
Choose the personalised wall set when you want the name integrated into a complete sky-inspired composition. The moon, cloud and star already create a finished grouping, making it easier to style a clear feature wall without adding several separate objects.
Choose the standalone name sign when the letters themselves should be the main design, when you want a choice of font style or when the sign will be combined with existing framed art.
- Choose the Wall Art Set: for one coordinated three-piece nursery composition.
- Choose the Nursery Name Sign: for a direct name-led feature with more typography choice.
- Choose both in separate zones: when you want a coordinated room without repeating the name on one wall.
From Personalisation to the Finished Wall
The Moon, Cloud & Star set is made to order in AtaNova’s Antwerp atelier. Enter the child’s name exactly as it should appear, choose the size and material, then review the digital Design Proof sent by email before production begins.
Production takes 1–2 business days and is already included within the total estimated delivery time of 3–5 business days from the order date. Prompt Design Proof approval helps keep the order on schedule.
Explore the Personalised Nursery Wall Set, compare other personalised room pieces in the Baby & Kids collection, or review the full approval process on the How It Works page. For another theme, sibling design or bespoke wall concept, submit a request through Custom Projects & Bespoke Orders.
Frequently Asked Questions
What is the best starting point for styling a personalised nursery wall?
Choose one focal point first. Build the wall around the child’s name, then select the size, material and supporting colours according to the room rather than adding several unrelated decorations.
Which Wall Art Set size should I choose?
Choose 30 cm for compact wall areas, 45 cm for a balanced middle size and 60 cm for a larger feature wall. The selected size refers to the approximate width of the cloud, while the moon and star are scaled proportionally.
Where should personalised nursery wall art be placed?
Suitable locations include above a dresser, beside a reading corner or on a clear feature wall. Choose a position where every piece can be mounted securely and remains completely out of reach of babies and young children.
Can the Wall Art Set be placed above a cot or crib?
Only use that location when every piece can be mounted securely with a fixing method suitable for the wall and kept completely out of the child’s reach. When there is any uncertainty, choose another wall such as the dresser wall or an opposite feature wall.
Which material is best for a nursery wall?
Choose Wood for warm and natural styling, Black Acrylic for clean contrast or Gold Acrylic for a more decorative accent. The best option is the one that supports the room’s existing palette without competing with it.
How do I style the set in a small nursery?
Use one focal composition, choose the size according to the usable wall area and keep clear space around the pieces. Avoid adding several fonts, quotations, frames and themes to the same wall.
Are mounting materials included with the Wall Art Set?
No. Mounting materials are not included because the correct fixing method depends on the wall surface and product weight. Use a secure suitable method and follow the fixing manufacturer’s instructions.
How long does a personalised nursery wall set take to arrive?
Production takes 1–2 business days and is included within the total estimated delivery time of 3–5 business days from the order date. Production begins after the Design Proof is approved.