The right wedding welcome sign is the one guests can read easily, the venue can display securely and the rest of the wedding styling can support. Before ordering, decide four things: the viewing distance, the acrylic background, the amount of wording and the display position. For most standard ceremony or reception entrances, A2 offers the most balanced presence. A3 suits compact, close-range displays, while A1 is designed for larger entrances and statement installations.
This guide explains how to choose between A3, A2 and A1, compare clear, white and black acrylic, plan readable wording and prepare the sign for the venue. You can also view the Personalised Wedding Welcome Sign while comparing the available options.
Quick Answer: Which Wedding Welcome Sign Should You Choose?
- Choose A3 — 30 × 40 cm for an intimate wedding, civil ceremony, welcome table or entrance where guests will stand close to the sign.
- Choose A2 — 40 × 60 cm for most standard ceremony and reception entrances. It offers a visible focal point without dominating the space.
- Choose A1 — 60 × 80 cm for a large venue, wide entrance, floral statement or display that must be noticed from farther away.
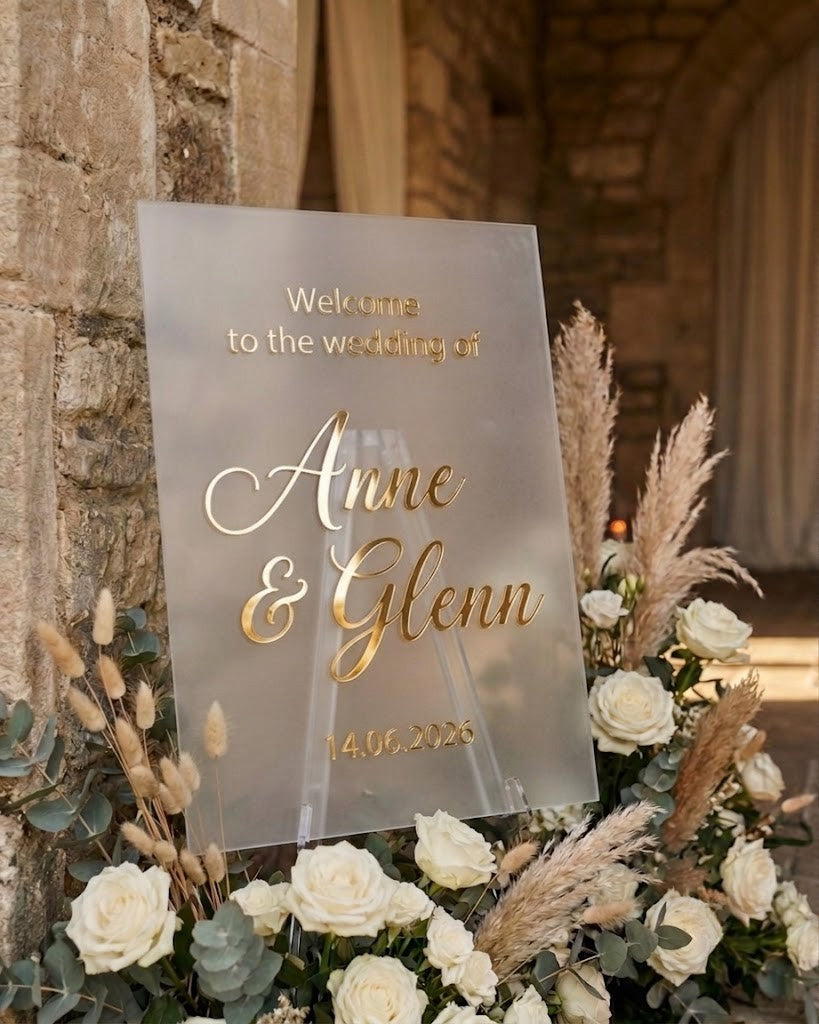
- Choose clear acrylic when the backdrop, flowers or venue surface should remain visible through the sign.
- Choose white acrylic for a bright, clean and classic background with clear contrast against gold lettering.
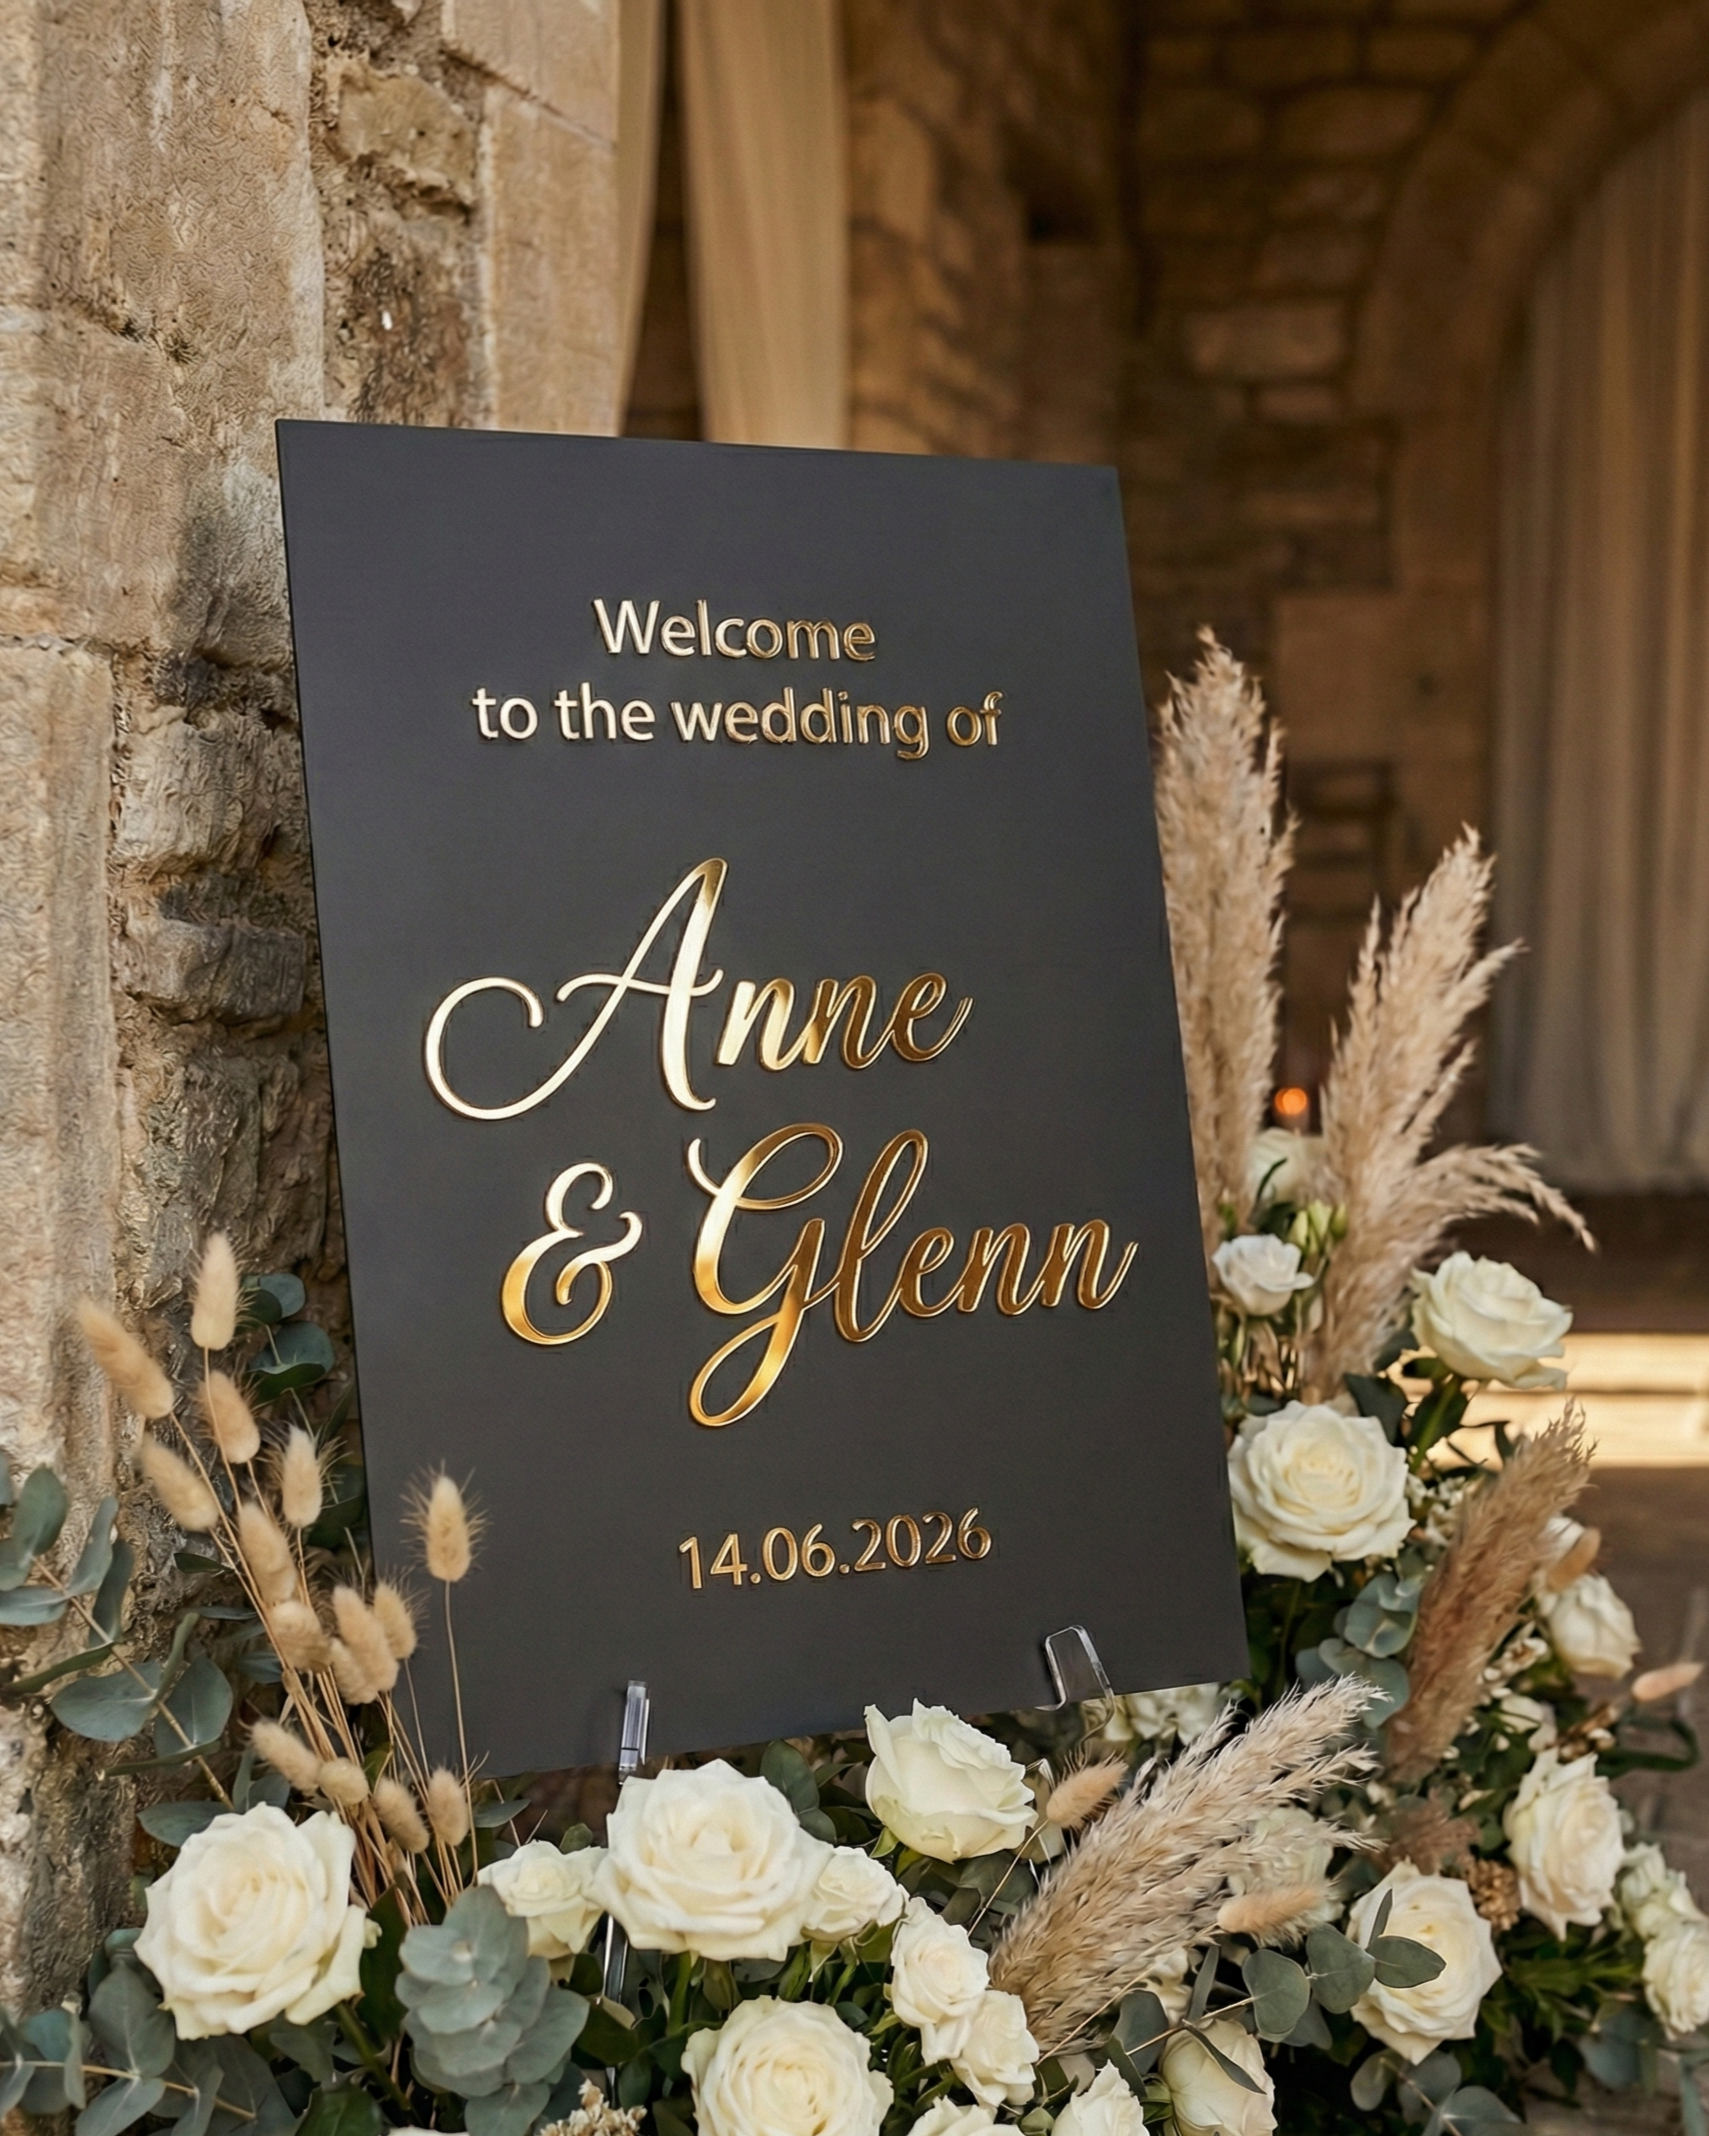
- Choose black acrylic for a stronger black-and-gold look suited to evening receptions and dramatic styling.
What Are You Actually Choosing?
A wedding welcome sign is not only a decorative board. It is the first personalised marker guests see when they arrive. It confirms that they are in the right place, introduces the couple’s names and establishes the visual tone of the celebration.
The AtaNova sign is made from a 4 mm acrylic base with individually laser-cut gold mirror acrylic letters applied by hand. The lettering is raised from the surface, so the design has physical depth rather than a flat printed or sticker finish.
Your main buying decisions are:
- The sign size
- The acrylic base finish
- The wording and text hierarchy
- The venue background and lighting
- The easel or display support
- The indoor or sheltered outdoor position
- The time available for Design Proof approval and production
How to Choose the Right Wedding Welcome Sign Size
Size should be based on where the sign will stand and how far away guests will first see it. Guest count alone is not enough. A small wedding in a wide venue entrance may need a larger sign, while a larger guest list entering through a compact hallway may not.
A3 — 30 × 40 cm
A3 is the most compact option. It works best when guests will view the sign from nearby and the display area is intentionally small.
- Intimate weddings and civil ceremonies
- Small venue entrances
- Welcome tables and guest-book areas
- Indoor displays with limited floor space
- Decor arrangements where the sign is one detail among several objects
A3 may feel too small at a broad reception entrance, in a large hall or inside a tall floral installation. It is strongest when placed close to the natural walking route.
A2 — 40 × 60 cm
A2 is the most versatile choice for a standard wedding entrance. It creates a clear personalised focal point while remaining practical for common venue layouts and easels.
- Reception halls
- Ceremony entrances
- Hotel and restaurant weddings
- Medium-sized floral or fabric backdrops
- Guest arrival areas where the sign is viewed from a moderate distance
Choose A2 when you want the sign to be clearly visible but do not need it to dominate the entrance.
A1 — 60 × 80 cm
A1 is designed for visual impact and longer viewing distances. It is the strongest option for an entrance that needs a statement piece.
- Large reception halls
- Wide doors, staircases or arrival zones
- Large floral arrangements
- Sheltered outdoor entrances
- Displays photographed as a main wedding detail
A1 needs enough surrounding space and a stable support. Before ordering, confirm that the venue can accommodate the full 60 × 80 cm board without narrowing a walkway or blocking doors.
Measure the Display Area Before Ordering
Do not choose the sign size only from a product image. Product photography does not show the scale of your venue.
Use this simple measuring method:
- Ask the venue where welcome signage may be placed.
- Measure the available width and height.
- Mark the planned A3, A2 or A1 outline with masking tape, paper or cardboard.
- Step back to the point where guests will first see the entrance.
- Check whether the marked area feels visible, balanced and clear of doors or walkways.
- Confirm that your easel or stand supports the selected dimensions securely.
This test is especially useful when choosing between A2 and A1. A larger sign is not automatically better if the surrounding area is narrow or visually busy.
How to Choose the Acrylic Base Finish
All active AtaNova Welcome Sign variants use raised gold mirror acrylic lettering. The base finish changes the contrast, transparency and overall mood of the sign.
Clear Acrylic
Clear acrylic creates a light, modern and visually open effect. Flowers, fabric, greenery, stone or another styled backdrop remain visible through the board.
Choose clear acrylic when:
- The background is part of the design
- The sign will stand in front of flowers or draped fabric
- You want a modern, minimal appearance
- The venue surface behind the sign is clean and intentional
Clear acrylic needs careful placement. A cluttered wall, emergency signage, doorway activity or mixed background can reduce readability. Check the exact view behind the sign before choosing this finish.
White Acrylic
White acrylic gives the gold lettering a bright, clean background. It is the easiest finish to coordinate with classic, romantic and light-coloured wedding styling.
Choose white acrylic when:
- You want strong separation between the wording and the venue background
- Your palette includes white, ivory, champagne, blush or soft pastels
- The wall or display area behind the sign is visually busy
- You prefer a clean and timeless entrance look
White is a practical choice when you cannot fully control the background at the venue because the solid base protects the design from visual interference.
Black Acrylic
Black acrylic creates the strongest contrast with gold mirror lettering and gives the sign a more dramatic presence.
Choose black acrylic when:
- The wedding palette includes black, gold or deep colours
- The reception takes place in the evening
- The venue has a modern, industrial or luxurious interior
- You want the sign to function as a bold entrance statement
Check the lighting around a black sign. The reflective gold letters need enough front or ambient light to remain easy to read and photograph.
Why Raised 3D Gold Lettering Changes the Result
The gold wording is not printed onto the board and is not made from vinyl stickers. Each letter is precision laser-cut from gold mirror acrylic and applied to the base by hand.
This construction creates:
- Visible depth between the base and lettering
- Small natural shadows around the raised text
- A reflective finish that changes with the viewing angle
- A more physical and lasting object than a disposable printed poster
The 3D effect is most noticeable when light reaches the sign from the front or side. It can also make the couple’s names stand out clearly in venue and detail photography.
How Much Wording Should a Wedding Welcome Sign Include?
The strongest welcome signs are easy to understand in a few seconds. Guests are usually walking, greeting people or finding their way into the venue, so the sign should not read like a full invitation.
A clear wording structure is:
- A short welcome phrase
- The couple’s names as the visual focus
- The wedding date
- An optional venue, city, surname or brief line
Examples of suitable structures include:
- Welcome to the wedding of Emma & Lucas
- Welcome to our forever — Emma & Lucas — 14 September 2026
- Together with our families, we welcome you
- The Martins — Est. 2026
Keep optional wording brief. Long quotes, schedules, directions and multiple instructions compete with the names and reduce readability. A welcome sign should welcome and identify; detailed event information is usually clearer on separate signage.
Check Every Personalised Detail Before Approval
Enter names, dates, accents, punctuation and special characters exactly as they should appear. The wording can be submitted in different languages or alphabets, which is useful for multilingual or international weddings.
Before approving the Design Proof, check:
- The spelling of both names
- The order of the names
- The date format
- Accents and special characters
- Capitalisation
- Punctuation
- The welcome phrase
- Any venue, city or surname line
The proof is the final opportunity to correct the personalised information before the gold letters are cut and applied.
Match the Sign to the Background, Not Only the Colour Palette
A sign may match the wedding colours perfectly and still be difficult to read if the venue background works against it.
Consider these combinations:
- Clear acrylic against greenery or soft fabric: modern and layered, provided the background is not too detailed.
- White acrylic against brick, dark wood or a busy wall: clean separation and strong visibility.
- Black acrylic against a light wall or illuminated entrance: high-impact black-and-gold contrast.
- Any finish inside a floral installation: leave enough open space around the names so flowers do not cover the lettering.
Ask the venue or planner for a photo of the exact entrance in similar lighting. This is more useful than choosing from a general venue gallery.
Plan the Easel or Display Support Separately
An easel or display stand is not included with the Welcome Sign. Arrange a stable support that is appropriate for the selected A3, A2 or A1 size.
Before the wedding, confirm:
- The easel platform is wide and deep enough
- The sign cannot slide forward
- The support stands securely on the venue floor
- The display does not narrow the guest walkway
- Flowers, fabric or lighting equipment will not push against the raised letters
- The sign can be moved safely during setup and breakdown
Do not wait until the wedding morning to test the stand. A quick setup test with the actual sign prevents last-minute balancing problems.
Where Should the Welcome Sign Be Placed?
Place the sign at the point where guests need confirmation that they have reached the wedding. It should be visible before they have to choose a direction or enter the main celebration space.
Useful positions include:
- The ceremony entrance
- The reception doorway
- The beginning of the arrival walkway
- Beside the guest book or gift table when this is the first arrival point
- Inside a floral or fabric entrance installation
Avoid placing the sign behind open doors, directly in a queue, in a narrow passage or where guests will repeatedly brush against the raised lettering.
Can an Acrylic Wedding Welcome Sign Be Used Outdoors?
The sign can be used in a secure, sheltered outdoor event position, but it is not intended for permanent or unprotected outdoor installation.
Protect it from:
- Rain
- Strong wind
- Direct heat
- Unstable or uneven surfaces
- Areas where the sign may be knocked over
For an outdoor wedding, make sure the venue has an indoor or covered backup position. A1 creates more wind resistance than A2 or A3, so the display support must be especially secure.
How the Design Proof Process Works
A digital Design Proof is emailed before production. This allows you to review the personalised layout before any letters are cut.
- Submit the names, wedding date, wording and relevant notes with the order.
- AtaNova balances the typography, spacing and placement for the selected sign size.
- The Design Proof is sent by email.
- Review every personalised detail and the overall layout.
- Approve the proof or reply with a small correction.
- Production begins after approval.
Read the full approval process on the How It Works page. Prompt approval helps keep the order within the expected delivery window.
When Should You Order the Welcome Sign?
Production normally takes 1–2 business days after Design Proof approval. This production period is included within the overall delivery promise of 3–5 business days from the order date when the proof is approved promptly.
For a wedding, ordering at least three weeks before the event is recommended. This provides additional time for:
- Design Proof review
- Delivery and tracking
- Checking the sign on arrival
- Testing the easel or display stand
- Coordinating the sign with flowers and venue styling
Do not plan only around the production time. The sign also needs to fit into the venue setup, transport and styling schedule.
How to Coordinate the Welcome Sign with Other Wedding Details
A coordinated wedding does not require every item to look identical. It requires a consistent material, colour or wording decision that repeats across key details.
You can continue the entrance style with:
- Personalised Wedding Table Numbers for the reception tables
- A Personalised Cake Topper using matching names, initials or a short phrase
- Gold accents in the floral stand, candle holders or stationery
- The same date format and name order across signs and keepsakes
Browse the Wedding & Events collection to compare the available personalised pieces.
When a Standard Welcome Sign Is Not the Right Option
The standard product is available in A3, A2 and A1 with clear, white or black acrylic and raised gold mirror lettering. A different size, finish, seating plan, bar sign, menu sign or coordinated signage set requires a bespoke enquiry.
Use the Custom Projects & Bespoke Orders page when the project falls outside the active product options or needs multiple coordinated pieces.
Final Buying Checklist
- Have you measured the actual display area?
- Will guests view the sign from close range, medium distance or far away?
- Does A3, A2 or A1 suit that viewing distance?
- Will clear, white or black acrylic remain readable against the venue background?
- Is the wording short enough to understand quickly?
- Have you checked names, date, accents and punctuation?
- Have you arranged a stable easel or display stand?
- Is the position indoors or securely sheltered?
- Can you approve the emailed Design Proof promptly?
- Have you allowed time to test the complete display before the wedding?
Choose the Sign Around the Entrance
The best wedding welcome sign is not selected in isolation. It is selected for a specific doorway, backdrop, viewing distance and message.
Choose A3 for a close and compact display, A2 for a balanced standard entrance or A1 for a larger statement. Then select clear, white or black acrylic according to the real background and lighting. Keep the wording focused on the welcome, names and date, and prepare the display support before the event.
When those decisions are made in the right order, the sign becomes more than decoration. It becomes a clear, personalised beginning to the wedding day.
View the Personalised Wedding Welcome Sign
Frequently Asked Questions
What size wedding welcome sign should I choose?
Choose A3 at 30 × 40 cm for intimate, close-range displays; A2 at 40 × 60 cm for most standard ceremony or reception entrances; and A1 at 60 × 80 cm for large venues, wide entrances or statement installations viewed from farther away.
Which acrylic finish is best for a wedding welcome sign?
Choose clear acrylic when the styled background should remain visible, white acrylic for a bright and classic high-contrast look, or black acrylic for a dramatic black-and-gold appearance. The best choice depends on the actual backdrop and lighting.
Is the gold lettering printed or made with stickers?
No. The gold mirror acrylic letters are precision laser-cut individually and applied by hand to the 4 mm acrylic base, creating a raised 3D finish.
What wording should I put on a wedding welcome sign?
Use a short welcome phrase, the couple’s names and the wedding date. You may also add a surname, venue, city or brief line, but keeping the wording concise helps the sign remain readable from a distance.
Is an easel or display stand included?
No. An easel or display stand is not included. Arrange a stable support suitable for the selected A3, A2 or A1 sign size and test it before the wedding.
Can the Welcome Sign be used outdoors?
It can be used in a secure and sheltered outdoor event position, but it must be protected from rain, strong wind, direct heat and unstable surfaces. It is not intended for permanent or unprotected outdoor installation.
Will I receive a Design Proof before production?
Yes. A digital Design Proof is sent by email before the letters are cut. Check names, date, spelling, punctuation, special characters and layout before approving it.
How long does production and delivery take?
Production normally takes 1–2 business days after Design Proof approval and is included within the overall 3–5 business-day delivery promise from the order date when the proof is approved promptly. Ordering at least three weeks before the wedding is recommended.
Can I request a custom size or matching wedding signage?
Yes. Custom sizes, seating plans, bar signs, menu signs and coordinated signage sets can be requested through AtaNova’s Custom Projects & Bespoke Orders page.